Showing posts with label fat kid. Show all posts

Tuesday, February 19, 2013

Carbaholic

Hi. I'm Bonnie and I am a Carbaholic.

It's a real problem. Especially when you're a diabetic.

Lucky for me, my addiction comes out only during a certain time of the month, if you catch my...flow. Apparently, I carb load in preparation for my period. My body is preparing, like I'm about to run a marathon. It knows it needs to store energy to survive. What's the cheesy pinterest saying? "Never trust anything that bleeds for 5 days and doesn't die."

Anyway, now that I divulged waaay more information then you ever really wanted to know about my menstrual cycle, I've been trying to find ways to feed my cravings without killing my diet (and insulin pump). And I have been failing. MISERABLY. Hello brownies!

In attempt to get back on course and still curb my carb cravings, I made these delicious, healthy chocolate muffins....and ate 3 of them for breakfast.

Cinnamon Chocolate Muffins

by Bonnie Graham
Cook Time: 16 - 18 minutes
Keywords: bake dessert breakfast snack low-carb cinnamon oats
Ingredients (12 muffins)
  • 1 3/4 c oats
  • 2 eggs
  • 3/4 c unsweetened cocoa
  • 1/2 c unsweetened applesauce
  • 1 tsp vanilla extract
  • 1 tsp cinnamon
  • 1/2 tsp cayenne pepper (optional - if you want it spicy!)
  • 1/2 c plain yogurt
  • 1/2 tsp cream of tartar
  • 1 1/2 tsp baking powder
  • 1 1/2 tsp baking soda
  • 1/4 tsp salt
  • 1 c water
  • 1/4 c stevia extract cup or 3/4 c sweetener of choice
  • 1/2 c chocolate chips
Instructions
1. Preheat oven to 350 degrees. Line a muffin pan with foil cupcake liners (paper ones will stick) or spray tin with cooking spray.
2. In a blender, (or food processor), mix all of the ingredients together, except for the chocolate chips. Blend until oats are ground and mixture is smooth. Alternatively, you can use oat flour and mix everything in a mixing bowl once the oats are ground.
3. Place mixture in a bowl and stir in the chocolate chips
4. Place muffins tins in the oven for 10 minutes. After 10 minutes, you can choose to remove the muffins from the oven and add some extra chocolate chips on top, but it's not necessary.
5. Continue to back for an additional 4-7 minutes or until a toothpick comes out clean.
Powered by Recipage

Monday, October 15, 2012

Coping Mechanism

Urdvahastasana
Uttenasana
Urdvah Mukhasvasana
Adho Mukhasvasana

No, that's not Jackson walking across my laptop. Nor am I having a stroke. Those are actually words. In Sanskrit. If you think spelling them is hard, try saying them. To a roomful of people.

This is what the first weekend of Yoga Teacher Training held for me. While this first weekend was exciting, interesting, and energizing, it was also overwhelming and intimidating. On the third day of our training, we had to "teach" each other the poses of Sun Salutation A. If you have ever taken a yoga class before, this is a pretty common set of poses. Even my father knows Downward Dog. What is not so common is saying the Sanskrit names for each pose to a room of 20 people!

In preparation for my teaching debut on Sunday morning, I did what I normally do to calm my nerves and kill some time. I cooked my little heart out!

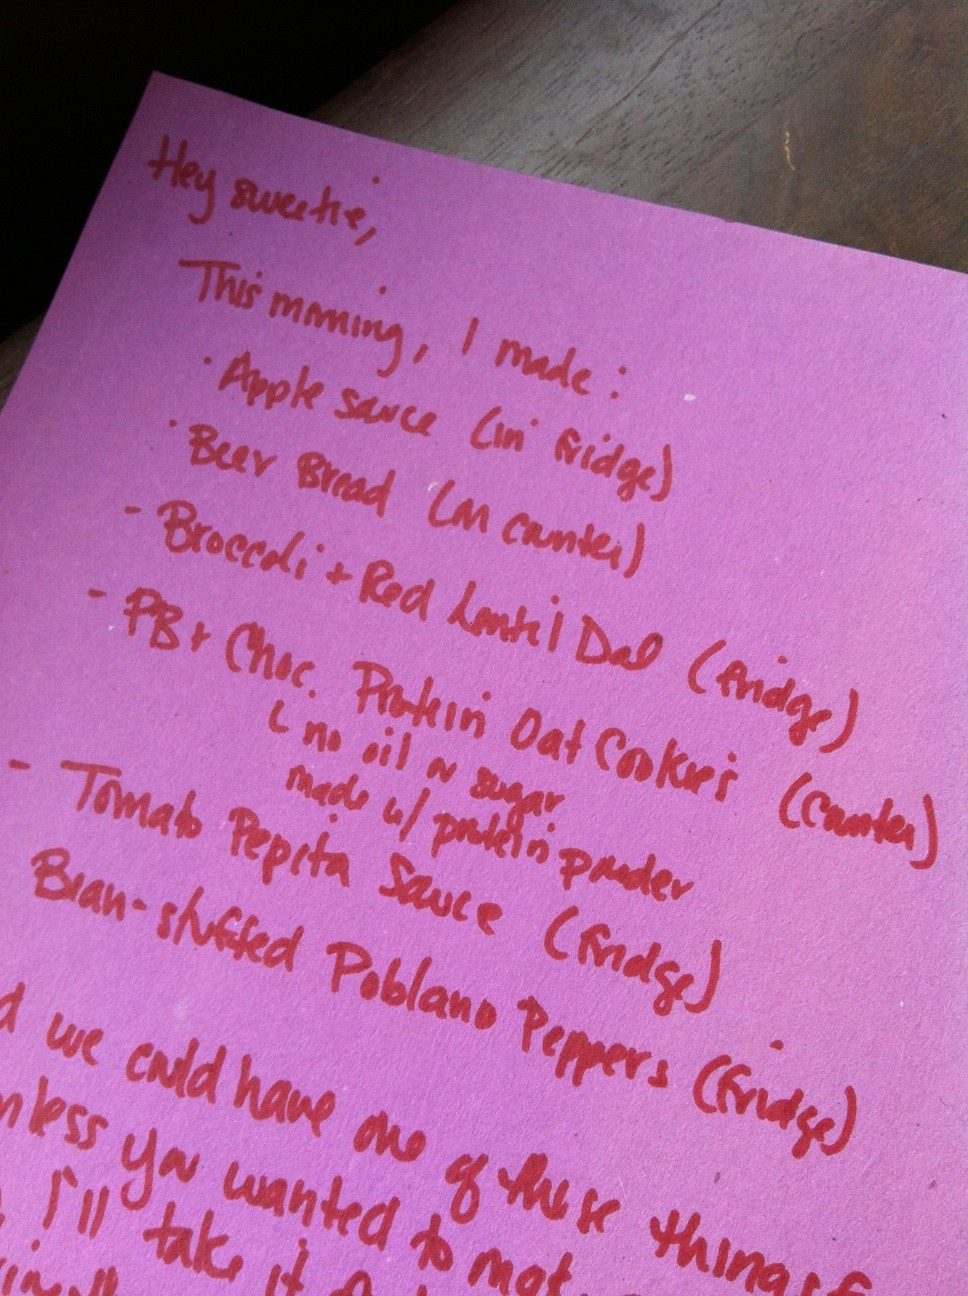
For me, cooking serves many purposes. Besides the obvious need for nourishment, cooking is a way of coping with something that may be stressful, of releasing energy, of procrastinating. Maybe you can tell from the photo below just how much "coping" I needed since I cooked enough food for a small army.


In case you can't read my chicken scratch, I made:
  • Applesauce
  • Beer Bread
  • Spicy Broccoli + Red Lentil Dal
  • Peanut Butter Chocolate Protein Cookies
  • Tomato Pepita Sauce
  • Bean-stuffed Poblano Peppers
All before leaving for my training at 1 PM. In.Sane.

One of the dishes I made used my fresh farmer's market broccoli. Yay! This dish is spicy. If spice isn't your thang, feel free to adjust the spices to your liking.


Spicy Broccoli and Red Lentil Dal

by Bonnie Graham
Keywords: entree vegetarian red lentils broccoli


Ingredients (4 servings)
  • 1 c red lentils
  • 1 large onion, chopped
  • 1 tsp ground cumin
  • 1 tbsp mustard seeds
  • 2 tbsp extra virgin olive oil
  • 3 c chopped fresh broccoli
  • 2 1/2 c vegetable broth
  • 2 c milk
  • 2 tbsp fresh lemon juice + lemon wedges for garnish
  • 2 tsp red pepper flakes
  • 1 tbsp garam masala
  • 1 1/2 tbsp curry powder
  • 1 tsp tumeric
  • paprika, to garnish
Instructions
1. Add oil to a large saucepan over medium heat. Add in the uncooked lentils, chopped sweet onion, cumin, and mustard seeds. Cook on low-medium heat for about 6-9 minutes until the mixture begins to sizzle.
3. While this mixture is cooking, roughly chop the florets. Place stems and florets into a food processor and process to desired consistency.
3. Add broccoli and veggie broth to saucepan. Stir well. Add salt.
4. Cover and cook this mixture on low for 20 minutes, stirring occasionally.
5. After about 20 minutes, add in milk, lemon juice, turmeric, garam masala, red pepper flakes, curry powder, and additional salt (to taste) if necessary.
6. Cook on low for another 10 minutes. Serve.
Powered by Recipage

Friday, October 5, 2012

On Repeat

I'm not sure if you noticed, but I like to cook. I also like diversity. Jerry also likes these things.

The problem with two cooks in the kitchen is that we come up with original recipes on a regular basis. Which doesn't initially seem like a problem. Except we never seem to have the same meal twice. Even meals that we really enjoy. 

This is a meal that we said we would make again. That we talked about how good it was the entire time we ate. That we actually saved the scraps of our bowls so we could have them for leftovers. 

This meal will be put on repeat. Oh yes. It will. 


Moroccan-Inspired Butternut Squash Quinoa

by Bonnie Graham
Keywords: roast entree vegetarian butternut squash quinoa apples fall winter


Ingredients
  • 1 large butternut squash, peeled and diced
  • 1/2 c quinoa
  • 2 c water
  • 1 large onion, diced
  • 1 apple, diced
  • 1/3 c raisins
  • cinnamon, to taste
  • nutmeg, to taste
  • cayenne pepper, to taste
  • smoked paprika, to taste
  • cumin, to taste
  • salt and pepper
Instructions
1. Preheat oven to 450 degrees.
2. Roast butternut squash on an oiled baking sheet with salt and pepper for 45 to 50 minutes, flipping half way through.
3. Meanwhile, place quinoa with 2 cups of water over medium high heat. Simmer for 15 to 18 minutes.
4. While everything else cooks, saute onions and apples over medium heat until soften. Season with salt, pepper, cumin, cinnamon, and nutmeg. Add raisins.
5. Once everything is done cooking, flavor quinoa with the cumin, cinnamon, nutmeg, paprika, and cayenne, tasting as you flavor.
6. Top quinoa with squash and onion mixture. Enjoy!
Powered by Recipage

Monday, September 24, 2012

Breaking the Seal

I know I just wrote a post about grasping onto every last bit of summer. And how I try to avoid accepting the autumn season for as long as I can.

But I've already done it. I broke the seal. The pumpkin seal. I have already opened my first can of pumpkin. Okay, fine, my first two cans of pumpkin!

I didn't mean to. It just sort of....happened. Before I knew what I was doing, I had opened a can and added it to oatmeal. Then, when I saw a recipe for Pumpkin Pie Chia Pudding....well, let's just say I had no choice. It couldn't have been avoided any longer!

And since we're being all honest with each other, I have another pumpkin confession to make. This is a bad one too. 

Last week, I suddenly came down with a stomach virus. Initially, I thought I had just woke up with an upset stomach, assumed it would pass, and continued getting ready for my day. Since seeing the recipe the day before, all I could think of making was Pumpkin Pie Chia Pudding! I mix it up and put it in the fridge to chill, only for the full force of the stomach virus to hit me several minutes later.

When I was finally able to leave the bathroom, I decided to try a bite. It was good. It was so good, I had another bite, and another bite. Before I knew it, I had eaten half of the pudding! I kept thinking, "I have to save same for Jerry. I have to save some for Jerry."

But then the lawyer (or fat kid, take your pick) in me kicked in, "Will he really eat this knowing that I made it while I was sick? Probably not. And it would be unfair to him to have it in the fridge and him not be able to eat it. I should just eat the whole thing and poor Jerry won't have to suffer that torment."

Which is exactly what happened. I finished the entire bowl of pudding!

Slightly disgusted, partially embarrassed, I rinsed the dishes, put them in the dishwasher, and no one was the wiser. I'd like to think that karma came back around as I spent the next hour in the bathroom, not enjoying my Pumpkin Pie Chia Pudding.

Now, who wants some pudding?!?

Pumpkin just doesn't photograph well.

Pumpkin Pie Chia Pudding

by Bonnie Graham
Prep Time: 10 minutes
Keywords: food processor dessert snack chia seeds pumpkin fall


Ingredients (4 servings)
  • 3/4 c milk
  • 1 c canned pumpkin, chilled if possible
  • 3 tbsp chia seeds, ground into a powder
  • 1 tsp vanilla extract
  • 1/2 heaping tsp cinnamon, or more to taste
  • 1/4 tsp ground ginger
  • 1/4 tsp nutmeg
  • 1/4 tsp clove
  • 2 tsp sucunat or sweetener of your choice
Instructions
1. Ground your chia seeds into a medium fine powder. Set aside.
2. In a food processor or blender, combine milk, pumpkin, vanilla, sweetener, and spices. Blend well to combine. Scrape down sides.
3. With processor running, slowly pour in chia seed powder. This is to help the chia seeds be more evenly distributed in your pudding and so you don't end up with blogs of chia stuck together. Scrape down sides and process for 30 seconds longer.
4. Pour pudding into preferred container. Let set in the fridge for 1 to 2 hours before enjoying!
Powered by Recipage

Monday, May 21, 2012

Single Lady Serving

Recently, I started following Chocolate Covered Katie, a healthy dessert blog where recipes use all-natural, vegan-friendly ingredients. It's totally addicting! Especially since many of Katie's recipes are single serving size. Perfect for a diabetic fat kid where the term "portion control" might as well be in Icelandic.

Jerry will often read blogs with me....over my shoulder...while commenting that  he doesn't understand how I can spend so much time reading blogs...but oh, can you make that for me? Whenever I get to a  recipe Katie calls "Single Lady Servings," Jerry will say, "You can't make that. You're not a single lady." Sorry, sweetie, I'm a fat kid and that wins out every time. 

In reality, I think he's less concerned about our relationship status and more concerned that he won't get any! Good thing he has such a generous girlfriend who will make him his own "Single Lady Serving."


Chocolate Peanut Butter Soft Serve*
This recipe can be eaten straight out of the blender and will have a consistency similar to that of melted ice cream. You can also re-blend after freezing for a more soft serve consistency. 

Ingredients
1/2 c cottage cheese with pineapple (trust me, it's better then regular)
1 1/2 tbsp cocoa powder
1 - 2 tbsp peanut flour or peanut butter
1 packet Truvia or sweetener of your choice
splash of milk
3 - 8 ice cubes, depending on your preferred consistency

Method
1. Add all ingredients into a blender. Blend until smooth and creamy.
2. Either enjoy straight from the blender or place into individual ramekin and return to freezer. Freeze for 30 minutes or until desired consistency is reached.

*A few notes on ingredients:
  • You may have noticed the use of peanut flour. This is a new ingredient in my pantry and so far....I'm lovin' it! Peanut flour is made by taking roasted peanuts, grinding them into a paste (like peanut butter but without the added salt, sugar, or any added oils) and then pressing out the oil.  Since most of the oil's been pressed out, peanut flour is relatively low in fat. But it's still got all the protein, fiber, and other nutrients that make peanuts nutritional powerhouses.
  • You may have also noticed that cottage cheese is the primary ingredient in this recipe. Have no fear. It definitely does not taste like cottage cheese once you're done with it. 

Thursday, February 16, 2012

Fatkiditis: A Clinical Diagnosis

For the last few weeks, I've been hit with a case of Fatkiditis. I'm actually pretty disgusted with myself. My pants are fitting a little tighter and I have an uncontrollable urge to devour everything in sight. It's becoming a real problem!

I thought I'd share more information on this devastating disease.

Symptoms of Fatkidits may include but are not limited to:
  • A constant need to consume, even when you are beyond full and feel another bite would push you over the edge
  • Obsessive thoughts on when and what you will be eating at your next meal; this is an especially strong indicator when you have not yet completed the meal you are currently consuming
  • Decisions on social engagements are based on menu options
  • Vacations are planned around eating establishments and meals
  • Frequent questioning of others who have returned from a vacation or other social engagement (i.e. weddings, etc.) about what they ate and how the food was 
  • Attraction to other people who would also qualify for this diagnosis
  • Dislike of those who would not qualify -- Who likes a picky eater?!
  • Strong Indicator-- you have a food blog!
Fatkiditis is possibly contagious and may also affect animals. Jackson purrs every time I open the refrigerator door. Coincidence? I think not. 

Unfortunately, at this time, there is no cure. I am offering free evaluations for any concerned parties but, obviously, you will have to buy me dinner.

Thursday, January 26, 2012

Impulse Control?

Just to prove my addiction to crap lately....

When I fall in love with a particular recipe, I have a hard time stopping myself from consuming the entire amount of whatever has been prepared. As was (notice the past tense) the case with these Cracked Pepper Cornmeal Biscotti this weekend. I prepared these biscotti, thinking I would serve them as a side to my Chipotle Pumpkin Chili. Let's just say I have a crap load of chili that is sadly missing a cornmeal partner.

This recipe uses prepared cornbread mix, primarily because it was on sale at Trader Joe's. You may be asking yourself "Self, why would I go through the hassle of twice baking cornbread into a biscotti shape when I could easily just throw all of this crap into a pan and bake it?"

Well, first, you lazy little baker, this recipe offers a completely different texture then your usual cornbread. These biscotti are lighter and have a nice crispness to them! Second, it's so much more fancy to say you've made Cornmeal Biscotti then cornbread, honky! Third, and most important of all, because it's awesome!


Cracked Pepper-Cornmeal Biscotti (small batch, which is really all can be prepared in my house at one time)

Ingredients
1 cup packaged cornbread mix (preferred Trader Joe's)
1/4 c grated cheddar cheese
1/2 tsp freshly cracked pepper
1 egg
2 tbsp canola oil
2 tbsp milk

Method
1. Preheat oven to 350 degrees.
2. Mix all ingredients in a bowl. Mix will be thick and wet.
3. Pour mix onto parchment lined baking sheet. Don't worry too much about spreading it out as it will do it on its own. Plus, you don't want them to thin.
4. Bake for 20 minutes, or until golden brown.
5. Let cool on a baking sheet for 10 minutes. Reduce oven temperature to 300.
6. After 10 minutes, slice cornbread loaf into 1/2 inch slices. Place on baking sheet.
7. Bake on each side for 15 to 20 minutes or until golden on both sides.

Thursday, December 29, 2011

Grandma's Gnocchi

Hey there! Some of you may have noticed my absence. While the holidays definitely took up plenty of time, our family also had an unfortunate loss over this holiday season. My grandmother, who has been struggling with dementia for years, finally passed away on December 23rd.

I took on the responsibility of giving my grandmother's eulogy, which was no easy task. I thought I would share a portion of it with you here since it directly relates to why food really is so important to me. Try not to cry. :(

"I have always loved my grandmother's gnocchi. Ever since I was a little girl, when my mother asked what I wanted for Christmas day dinner, the answer has always been gnocchi. Besides actually loving the pasta, it also evokes a connection to grandmother. I can still remember being in the kitchen with her as she patiently rolled out the dough, floured the pans, and dropped each batch into boiling water. She always allowed me to help, no matter how much of a mess I would make. Years later, even with my mother being as wonderful a cook she is, no one's gnocchi is better then grandma's.

It’s probably what we remember most, sitting down to a table full of food surrounded by family. You gather together, eat, laugh, tell stories and love each other. And what we all knew, was that above all, your family was always there for you."

When I first read the opening lines to my friends, they joked that, of course, it had to start with food! I'm not sure if it's because we're Italian or that we come from a family of fat kids, but food has always been the thing to bring us together, whether it be holiday dinners, barbeques, or banquets. Food brings traditions and stories to the forefront of our minds in a way few other things can. Every time I make gnocchi, I will think of my grandmother and be reminded of my time with her. These last few days, I have had the urge to make gnocchi every day.

Thursday, December 1, 2011

Childhood Memories

Cynthia Martieri was my best friend in the 3rd grade. She was a very sweet girl who always had the best lunches. Her mother was from Italy and would send Cynthia to school with thermos of warm soups, couscous in broth, and kick-ass snacks! Plus, Cynthia had an "in" with the teachers as she went to the teachers' lounge WHENEVER she wanted to! She also had special containers of orange juice in their fridge. The perks of being her friend were awesome!

Had I realized then the reason for her special teachers' lounge privileges, I probably wouldn't have peer pressured her into sharing her lunch and orange juice with me quite so often. I am a fat kid, after all. Cynthia was a type 1 diabetic. But one of those normal ones, whose pancreas never really worked to begin with. Unlike mine, who decided to claim work-related disability and retire earlier. Lazy fucker. 


I can remember going to the teachers' lounge with her before lunch so that she could take her blood sugar. She was squeeze a huge glob of blood out onto a strip and wait 2 minutes before a color (much like an acidity test) would appear. She would then compare the color of the strip to the color code on the bottle to find out what range her blood sugar was in. I don't remember her taking any insulin shots. Funny how one blocks out things out. 

I can also remember one morning after a sleep over, Cynthia testing her blood sugar. Her mother was disappointed and said in her broken English, "Too many sweets last night." We had attended a neighborhood birthday party the night before where Cynthia and her family weren't quite as diligent in monitoring her eating. I distinctly remember blue and white iced birthday cake.

Remembering back to Cynthia actually makes me grateful for the advances in diabetes care. I can find out my blood sugar levels in 5 seconds from a .5 milligram of blood. I have a pump that can provide me with the insulin I need to .10 of a unit. There's no guess work or waiting involved. I can take a blood test that can let me know how well I am controlling my diabetes for the PAST THREE MONTHS! How incredible is that!

Diabetes sucks no matter when your pancreas decides to crap out. But I really am so grateful to be diabetic at this point in time where the technology has come so far and continues to only get better.

Wednesday, November 23, 2011

Gobble, Gobble!

I cried my way through last year's Thanksgiving dinner.

Having only been diabetic for two months by that point, I was still navigating my way through diabetic eating. Actually, that description is far too kind. It was more like......Having only been diabetic for two months by that point, I was still pouting and temper tantruming my way through diabetic eating.

I still was finding my bearings and obsessing over every blood sugar number I had. I avoided eating some of the usual favorites, like homemade stuffing and canned cranberry sauce. Nothing says yummy, or high blood sugar, like gelled, ruby reb high fructose corn syrup in the shape of a can! Mmmm....

You can be rest assured that there will be no crying at the Thanksgiving Day table this year! Besides that fact that it made my dinner soggy, I feel like I have a much better grip on eating as well as accepting that I may possibly have a high blood sugar after eating for 5 hours straight. Though it's my goal not to have high blood sugar, it's bound to happen at some point!

To help the ol' pancreas out a bit, I came up with two yummy Thanksgiving recipes that are low (or lower) in carbs that could easily replace the traditional favorites. Make them and give me thanks! :)

Oh....but first, a comment or two on ingredients. First,  Whole Foods has Pumpkin Puree for $1.25/can! I know! I was excited too! Second, I use Pumpkin Pie Spice in this recipe, which feels like a little bit of a cop out. Usually, I like to add my own flavor combination. However, Trader Joe's has this awesome Pumpkin Pie Spice mix, that include cinnamon and cardamom. Really good. Also, this recipe uses only 1/3 the amount of sugar (depending on how much you add)!


Pumpkin Pie Pudding - aka Crustless Pumpkin Pie

Ingredients
1 15 oz can pumpkin
1 12 oz can evaporated milk - I used fat free, but you could easily use 2%
2 eggs
1/4 - 1/2 c brown sugar
1 1/2 tsp Pumpkin Pie Spice
1 tsp fresh grated ginger
1 tsp vanilla extract
pinch of salt

Method
1. Preheat oven to 350 degrees.
2. Mix all the ingredients into a bowl until well combined.
3. Pour pumpkin mixture into a prepared baking pan or ramekins.
4. Bake for 35 to 45 minutes, or until mixture is set, but with a slight jiggle. Less if using ramekins.

Because you're saving some carbs on the crust and reduced sugar, I give you permission to add a dollop of whip cream!

Mashed Cauliflower - which could easily replace those traditional spuds!


Ingredients
1 large head of cauliflower, broken into smaller pieces
4 cloves of garlic, whole with skins on
1/4 c milk
1/4 c olive oil, divided
salt and pepper


Method
1. Preheat oven to 400 degrees.
2. Toss cauliflower and whole garlic cloves with enough olive oil to coat. Salt and pepper.
3. Place cauliflower in oven to roast for 35 to 40 minutes, until pieces are golden brown. May be less depending on your oven.
4. Squeeze garlic cloves into food processor. It should come out pretty easily.
5. Add cauliflower, milk, and more salt and pepper if desired. Puree cauliflower, streaming in an extra tablespoon or two of olive oil, until you have reached desired consistency. 

Tuesday, October 18, 2011

Stick of Butter - Optional

Isn't it redundunt to have to have two posts about end of summer sauce? Yes, but I'm doing it anyway!

In college, I had a roommate named Missy. Missy had a large, traditional Italian family who wanted to feed everyone...everything...all the time. Though Missy and her family's food was ridiculously good, it was also ridiculously bad as almost every meal had at the least one stick of butter! Everything! Shit you didn't even think would need butter had butter. Hmmm, wonder where that freshman 15 came from?

I learned many things that first year of college. One was that a stick of butter in everything you eat really isn't good for you (duh!). Two, that my high school metabolism was not interested in receiving a higher education and decided to drop out as soon as I hit 19! Lastly, there was one "healthy" dish I could count on my roommate to cook that had the option of no butter! Well, that and 10 cent beer nights with $3 tequila shots never ends well, but that's another post altogether.

I remembered this recipe when I was staring at the summer's last batch of zucchini and yellow peppers at the bottom of my fridge. The additional bonus to this recipe is that I could make it in my slow cooker! And I looooooovvvvveeee my slow cooker!

My roommate would make this sauce for family-style dinners with friends with the option of toasted breadcrumbs over the top. And, of course, the breadcrumbs were toasted with.....you guessed it....a stick of butter!


End of Summer Vegetable Sauce

Ingredients
1 large onion, sliced*
1 - 2 garlic cloves, minced*
2 medium zucchinis, sliced*
1/4 c veggie broth
1 yellow pepper*
1 28 oz can of diced tomatoes
1 tbsp tomato paste
2 tsp dried oregano
salt and pepper

1 stick (or pad) of butter (optional)
1/2 c bread crumbs
* indicates that these are locally farmed ingredients from Goshen, NY and PA.


Method
1. Heat olive oil in a pan and begin to saute sliced onions. Cook for few minutes until onions begin to soften and brown.
2. Add chopped garlic. Let garlic cook for a few minutes until slightly browned.
3. Add zucchini, yellow pepper, and veggie broth to deglaze the pan. Cook for a just few minutes longer.
4. Move your cooked veggies to your slow cooker. Add the tomatoes, tomato paste, oregano, salt and pepper. You can add a little more broth if you need more liquid, but remember that you veggies will continue to give off water as they cook down.
5. Set slow cooker to low for 4 hours.
6. To serve with breadcrumbs, melt butter (I'll let you judge how much you want) in a pan. Once butter is completely melted, add 1/2 c breadcrumbs. Toss in butter and let breadcrumbs brown slightly in the pan.

Serve sauce over pasta with breadcrumbs sprinkled on top. Or you can use this sauce to create a kick-ass flatbread.

End of Summer Sauce Flatbread

Ingredients
1 package prepared whole wheat dough
1/4 - 1/2 c flour (depending on how sticky your dough it)
1/4 - 1/2 c olive oil
1 - 1 1/2 c End of Summer Sauce (depending on how saucy you like it)
1 c grated cheese of your choosing
toppings of your choosing
salt and pepper

Method
1. Prehead oven to 450 degrees.
2. On a floured counter or cuttig board, roll out pizza dough to desired thickness. I find that prepared pizza dough doesn't really roll out that well, so don't feel bad if you can't get it to that thin.
3. Brush dough with olive oil. I find this helps it crisp up.
4. Layer on your sauce, cheese, and whatever other toppings.*
5. Bake in oven for desired doneness (some people like their shit burned).

* If you're using a lot of sauce, then I suggest par-baking the crust a little before layering on your sauce and toppings. You can place the dough in the oven for 5 to 7 minutes, just to give it ahead start.

Sunday, September 4, 2011

Supermarketing, Mexico-style!!!

Jerry was ridiculously excited for us to go to the supermarket here in Mexico. We're both fat kids who love to go food shopping. If only they would let us drink wine while we wandered the aisles, I'm sure many of our date nights would be spent at Whole Foods or Shop Rite.

However, truth be told, I was not expecting much of this Mexican supermarket. I am sure I have mentioned Jerry's love of divey places and enthusiasm for anything gritty.  It is, after all, what led us to eating bull penis.

To emphasize my point, let me tell you about the youth hostel where we stayed in New Orleans. Jerry acted like this hostel was the Taj Mahal!  The hostel where there wasn't a working light in our room, the bed was made out of 2x4's, and the bathrooms were communal? Yeah, that one. When the Jerry Garcia look-alike walked us through the main house out to the backyard where he showed us the hut we were staying in, I began to question our plan, wondered if we could scrap together enough cash for the HoJo. But not Jerry. He turned to me with a huge toothy grin and mouthed "This is awesome!"

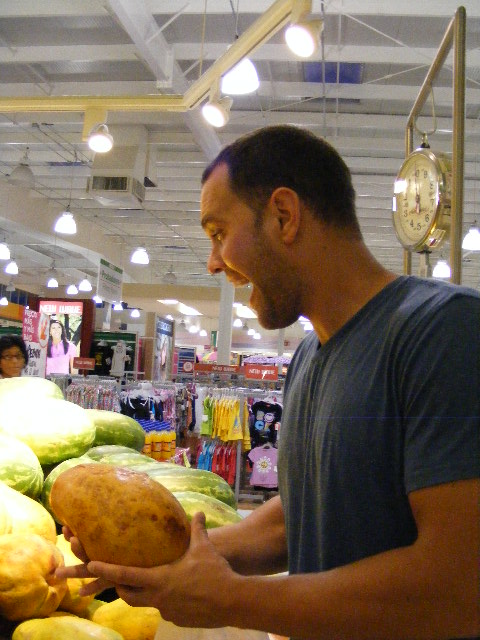
Jerry's so excited about papaya!!!
Thinking of Jerry's definition of "awesome" applied to a third world country supermarket, you can understand my concern.  However, I should have known my boy wouldn't steer me wrong!

The supermarket is awesome! So awesome in fact, we've already gone there three times in the two days we've been here. All the locals must think we're crazy gringos, snapping pictures of their shopping carts and running around their supermarket like it's Disneyland. Now if only Jerry would stop trying to get me to push him around in a shopping cart....

Don't know what they are, but they're delicious!


Those little daisy looking flowers is actually fresh chamomile. 

These things were bigger than my head!


Diabetic's Vacation?

Wednesday, August 31, 2011

Hurricane, Schmrricane!

What do you do when a stupid hurricane (which actually ends up to NOT be a hurricane) ruins your weekend plans?

If you're me, you make (diabetic-friendly) bread and eat soup!


Whole Wheat Oatmeal Bread with Flax

Ingredients
1 cup rolled oats
1 cup whole wheat flour
2 tbsp apple sauce
2 tbsp brown rice syrup (or sweetner of your choice)
2 tsp baking powder
1/3 cup flax seeds, grounded
1/4 cup whole flax seeds (for texture)
1/4 tsp salt
1 cup milk
Optional throw-ins: walnuts, dried fruit, etc.

Method
1. Preheat overn to 450 degrees
2. Mix all dry ingredients in a large bowl. You can choose to process the oats to a flour if you'd like a finer bread.
3. Mix in all wet ingredients. Stir until well combined.
4. Pour batter into greased loaf pan. Scatter small pads of butter over the top.
5. Bake for 20 - 30 minutes or until brown and golden on top.

Best warm out of the oven, toasted, or dipped into tomato soup.

You don't have tomato soup? Well good thing my fat kid survival skills kick in during natural disasters and I cook my ass off. Because now, I have an easy tomato soup recipe for you.

You can thank me later.


Quick Tomato Soup

Ingredients
1 tbsp olive oil
1 medium yellow onion, chopped
1 medium carrot, chopped
2 garlic cloves, chopped
1 tsp dried oregano
1 28oz can diced tomatoes
salt and pepper
1/2 can evaporated fat free milk
Optional: 1 cup prepared brown rice (I had extra in the fridge)
Garnish: 1 tsp prepared pesto (also, extra in the fridge)

Method
1. Saute onion, garlic, carrots, and oregano with olive oil in large pot until onions are translucent and carrots are beginning to soften. Salt and pepper as you go.
2. Add canned tomatoes and let simmer for 15 - 20 minutes.
3. Turn off the heat and use immersion blender to puree soup, leaving it as thin or as chunky as you like. If you don't have an immersion blender, you can puree some of it in a regular blender.
4. While still off the heat, add the evaporated milk. It gives the soup a nice creaminess without adding fat.
5. Place back on the heat for a few minutes to warm through, but don't boil once milk has been added.

Enjoy with fresh homemade bread while waiting for a "hurricane" to pass over your head!

Monday, February 28, 2011

Adventures in Japanese Street Food

On one of my first few dates with Jerry, I ate penis.  Hi Mom!  I believe when Jerry asked me whether I would try it, my response was "I'm always down to eat some dick!" I'm pretty sure it's the moment he fell in love with me.

You could say that we're adventurous eaters. Jerry more so then myself. If there is something bizarre and unusual on a menu, Jerry will find it, order it, and then try to make it at home. I can't even tell you what his "home version" of penis was. Don't worry, Mom. I didn't fall for it. :)

Kenka is a Japanese restaurant on St. Mark's Place in the Village. It specializes in Japanese street food and is delicious. It's kind of a dive-y place, but worth the salmonella risk! There are times, usually when intoxicated, that I will crave the okonomiyaki (Japanese pancake). I was excited about taking Jerry there because dive-y places is kind of his thing and the menu is filled with oddities. Plus, they give you free cotton candy (perfect for a diabetic!).
okonomiyaki
For starters, we ordered the raw salted squid, which taste like...well, salt, but squishier. We also ordered giant oysters that were the size of your fist! Initially, these babies were difficult to get down. They needed several bites. At the time, I thought they were mildly disgusting, like trying to ingest giant boogers (hey, we've all tried one, no?). Now when I think about it, they were better then boogers.

Oysters the size of your head!
We also ordered frog. No, not frog legs, but an entire frog. I felt badly eating the little guy, but he was delicious. I tried to justify that he's part of the fish family. Kermit made Jerry want to go out and make frog legs. It does mildly resemble the taste of chicken.

Kermit
And, then finally, the feast de'resistance...the penis! Bull penis, that is. Be not afraid my friends.

Mmmm....penis
It was.....creamy (eewwww). Actually, Jerry and I have differing views on the texture. I thought it had the texture of over-cooked calamari. Jerry describes it more as spongy. Notice I haven't mentioned taste yet. Mostly because it had none. It just tasted like whatever the sauce it was in.

So there you go! There's my first installment of our food adventures! Hope you enjoyed the penis!

Penis.

Thursday, December 30, 2010

Definition of a Fat Kid

Fat kid /fAt kId/ n. a state of mind where one's primary focus is food, whether it be eating, cooking, or thinking about all things food. Total enjoyment of said food is a requisite to this state of mind.

I often refer to myself as “a fat kid.” Usually, I’m met with rolling eyes and snickering as people typically assume that I’m neurotically referring to my actual weight. But really, I use the term “fat kid” to refer to much more than someone’s physical state. No, my friends, “fat kid” is a state of mind!

Fat kid is when, after you have eaten breakfast, you’re already thinking about lunch. And after lunch, there’s dinner. And in between breakfast and lunch and lunch and dinner, there are snacks. Fat kid is planning an entire vacation itinerary around where you eat (i.e. my New Orleans trip where we had a list of over 20 restaurants to eat in). Fat kid is eating until you feel like you can’t possibly eat another bite...and then eat more! Fat kid is when questioning friends  about their dates, vacations, weddings, etc, you ask not about the actual event, but what did they eat!

I am a fat kid. I like to surround myself with other fat kids. If you're not into food, then you can't be my friend.

Ok, so now I've got to sneak the diabetes in here. 

Being a type 1 diabetic doesn't necessarily lend itself to being a fat kid. Diabetes definitely changes one's relationship to food. The monitoring and logging of everything you eat is enough to suck the fun right out of food! Right now, I am working on reconciling these two divergent lifestyles, managing everything I eat while enjoying, savoring, gorging myself on my beloved grub. It's been rough. 

Diabetes sucks. 

True story.